

Polymer clay decor. Variety of DIY decor ideas. Free tutorials on polymer clay.
A cup decorated with figurines and flowers made of polymer clay is a great gift made by yourself. On this page of our web-site “Polymer clay ideas” you will find plenty of cute and interesting decor ideas for a polymer clay wine glasses, plates, cups to make them exceptional. Same you can do with plant pots, vases, boxes, ashtrays.
Free photo tutorials on polymer clay. The page is constantly updated. Except this, in the same way, you can decorate many items for the kitchen and home, for example, to sculpt a polymer clay décor for a cereals’ jar, a vase, a lamp shade, a casket.
A mug with polymer clay decor can be used for its intended purpose, you can drink both hot and cold drinks from it. Hand wash only. Do not use a dishwasher!
Baked polymer clay is always used for polymer clay cup decor, as it is completely waterproof and very durable. After sculpting and baking, the decor is glued to the cup with epoxy resin or epoxy glue. This is obligatory, since after baking, the polymer clay decor will not adhere tightly to a smooth ceramic or glass surface.
Attention! Decor is made on the outside part of the cup, where the cup does not come in contact with drinks.
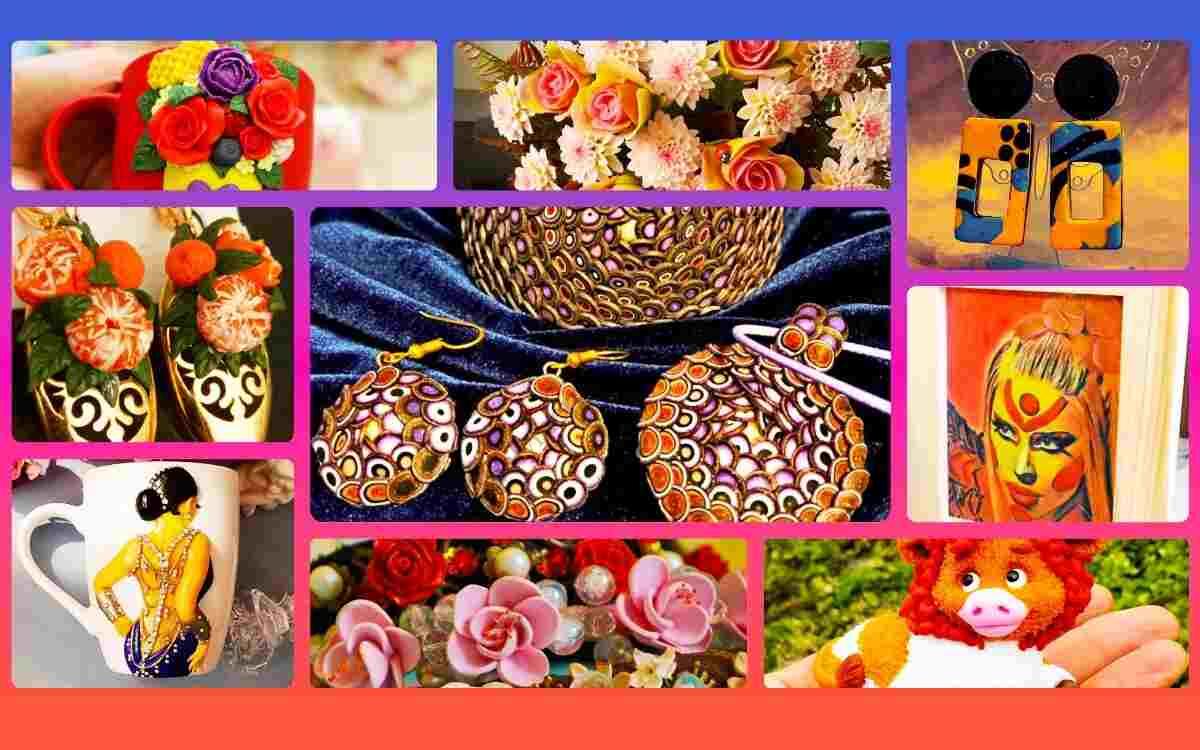
Polymer clay decor ideas foto:


TOP-10 best ideas Polymer clay decor
1. Polymer clay decor: The Girls


There is a tutorials just below on this page.
2. Polymer clay decor: The Dolls


There is a tutorials just below on this page.


3. Polymer clay decor: Teddy bears


Polymer clay decor: Teddy bears. Free tutorials >>
4. Polymer clay decor: Food


Polymer clay decor: Food – Ice cream, cake, burger, donut. Free tutorials >>
5. Polymer clay decor: Bunnies and cat


There is a tutorials just below on this page.
6. Polymer clay decor: Flowers


7. Polymer clay decor: Cookies and sweets


8. Polymer clay decor: Owls


There is a tutorials just below on this page.
9. Polymer clay decor: cartoon characters


Mug with polymer clay decor: The Unicorn >>
Polymer clay Free tutorial: Minion on a mug >>
Polymer clay decor cartoon fox on a cup ˅
10. Polymer clay decor: Company `s logo

Themed decor for the holidays!
Christmas polymer clay decor >>
AND New Year’s polymer clay decor. There is a tutorial just below on this page.


Polymer Clay Valentine’s Day Gift DIY. Polymer clay couple mugs decor: A half heart.


There is a tutorial just below on this page.
The top list of best decor is made up of the works of our masters, a link to each master’s page will be under the photo with tutorials on modeling decor from polymer clay.
Free tutorials on polymer clay decor
Polymer clay cup decor is always made in the same way. You take the cup you want to decorate. Only those cups and objects that can be baked in the oven are used for this. As far as the polymer clay decor is molded and baked already on a cup or object.
Content


1. Polymer clay mug decor: A couple of bears. Tutorial on polymer clay
2. Polymer Clay mug Decor: Husky Dog. Tutorial on polymer clay
3. Polymer Clay mug Decor: Ice cream cone with roses and sweets. Tutorial on polymer clay
4. Video tutorial on sculpting decor on a mug in the form of a beautiful girl with a cup of coffee.


6. Photo tutorial on decorating a teaspoon with polymer clay

8. Polymer clay: Cupcake on a mug. Tutorial on modeling from polymer clay
9. How to glue polymer clay decor to a mug
10. Mini cupcakes, décor of spoons with polymer clay
11. Polymer clay mug decor: Woman with a child. Tutorial on modeling from polymer clay


12. Polymer clay couple mugs decor: A half heart. Video tutorial on modeling polymer clay decor
13. Cute owl made of polymer clay on a cup. Video tutorial
14. Polymer clay burger on the cup. Video tutorial
15. Polymer clay mug decor: White cat. Beginner Video tutorial. DIY
16. Polymer clay decor cartoon fox on a cup. Video tutorial. DIY
17. Polymer clay decor Doll on a cup. Video tutorial
18. Polymer clay decor Cake on a cup. Video tutorial
19. Polymer clay decor cup: Snake in the leaves and Cartoon snake. Two videos tutorials
Polymer clay mug decor: A couple of bears. Photo tutorial on polymer clay>>


Polymer Clay mug Decor idea: Husky Dog. Photo tutorial on polymer clay


1. At first we make a drop-shaped flat base using polymer clay of white color, and press it to the cup with fingers.


2. We add one more layer of clay to the top part of basis, then smooth it on the sides, so that no seams are visible.

3. Sculpt the ears and the base of the eyes.

4. Add polymer clay under the eyes and form the cheeks.

5. Between the cheeks we add a triangular piece of polymer clay and form the nose.

6. Add a black nose, form a mouth by pressing the polymer clay inside.

7. After that we add blue eyes and black apples of the eyes.

8. Throughout the whole figurine of our polymer clay décor we draw the wool with a needle.

9. We take the black dry pastel and make the pollen from the pastel with a blade.


10. Then we draw a figurine, using a pollen from pastels.

11. Bake for 30 minutes at a temperature of 130 ° C / 265 ° F (this recommendations are written on the packaging of the polymer clay we used to make a Husky polymer clay cup, you may have different information, so you should bake according to the instructions for your polymer clay).
12. The final step is that we glue the figurine to our polymer clay cup with epoxy resin or glue and leave it for 24 hours.

Author: https://instagram.com/yasyapilipenko
Polymer clay decor: The girl with a coffee. Video tutorial on sculpting decor on a mug in the form of a beautiful girl with a cup of coffee.
It is a very beautiful mug decor in the form of a girl with a cup of coffee. You can use any good quality baked polymer clay for the decor. This is a very detailed video tutorial on sculpting decor on a mug in the form of a beautiful girl with a cup of coffee. After you have molded the decor on the cup according to our instructions, the mug must be baked, you should remove the decor and glue it with epoxy glue or epoxy resin. The mug and decor must be degreased with alcohol before gluing.

Such decor can be made not only on a mug, but on any item that you can bake in the oven. And even on any surface! BUT it is necessary to mold and bake on a glass or ceramics, since after baking, the decor is easily removed from the ceramic or glass surface and can be glued to any other surface! Therefore, your imagination should not be limited to any surfaces that can be baked in the oven, since the decor can always be re-glued later.
Polymer clay decor: Doll dressed up in winter clothes
You can decorate any item with such a cute doll. This kind of a decor will look especially cute for a Christmas present. For example, the decor can be made on a cup, as it shown in our case. But this decor can be made on any surface that can be baked in the oven. And you can even create it on a glass, as it shown in the next video tutorial on modeling polymer clay: A doll for decoration, and then it will be glued to any flat surface.
1 We are working on a sketch of our future decor.
We take white polymer clay and form the head and body of the doll from a round ball, as shown on the photo.

2 Try on our sketch.

3 Attach to the cup or to the item that we will decorate, sculpt the legs of the doll.

4 We take a dry art pastel, rub it, then take 2 shades of pinkish and sand colors (both colors are similar to flesh color, the shades are clearly visible on the photo). We tint our doll using dry pastel with a brush.

5 We sculpt clothes. It is not shown in great detail in this lesson. You can watch a more detailed video on sculpting of a similar doll for decor just below.

6 We take the extruder and a purple polymer clay. Using an extruder, we pull out thin threads from the clay. Then we roll the threads into flagella, form the hat of the doll from these flagella. In the same way we mold a hair of the doll with an extruder.

7 Attach a hat to our doll and attach deer horns to the hat.

8 We also pour out the eyes of the doll from black polymer clay.

9 We bake our cup with a decor in the form of a doll dressed up in the winter clothes in the oven, according to the instructions for your polymer clay. We remove our decor from the cup, glue it with epoxy resin or epoxy glue, let it dry for 24 hours.

10 Now we have such a beautiful cup with a decor.

Author: https://instagram.com/miniaturefordolls
Here is a very beautiful idea of polymer clay décor on a cup: “The Girl in an Evening Dress” by the same author.

In exactly the same way, you can sculpt the decor in the form of a doll, for example, like a doll of another author. The cup decor, but you can perform it on any item. A doll with angel wings in a pale blue dress. It is made exactly the same way using an extruder , we shape hair with the help of tools for polymer clay, we form a dress and wings. The eyes of our dolls are closed, they are just painted with acrylic paint using a brush #00.


Here’s another idea for a polymer clay decor by the same author: A doll in a unicorn costume.


Here is a video workshop on sculpting a doll made of polymer clay for decoration, it is molded and baked on a glass, then this doll can be glued to any surface using epoxy glue:

The mug decor with polymer clay: New Year’s bull. Polymer clay modeling tutorial for beginners. The video & photo.
The symbol of the coming New Year is the bull. Therefore, in this detailed video tutorial on modeling from polymer clay, we will sculpt a New Year’s gift, a mug with the symbol of 2021.


Here’s a brief tutorial on sculpting a bull on a mug in photos.
The video is inserted under the photo.
1. To mold a New Year’s bull, you need a flesh-colored baked polymer clay with a slight addition of brown, blue, white, gray metallic for the horns and hooves.


2. Fimo gel is used for the adhesion of clay between each other. A stack is for the eyes and nose. Blade, wet wipes are used to remove dust particles. And glass eyes.

For the making of the head
3. We roll the ball, apply it to the mug ,and make a flat head. We make the tip of the head flatter (where the eyes are situated), we make it more convex where the muzzle is. Roll out a small thick sausage for the nose. Smooth with the fingers. Cut out the middle from below and above. That would look a little like number 8. Apply it to the head, make holes with a stack in the corners.


4. Make a hole for the peephole with a stack, put inside a small amount of fimo gel, insert the eyes.


5. We make sausages for the ears, pull the tip, and press it against the mug. We make small lines inside the stack.


For the making of the hat
6. We create a triangle from blue clay. You can cut off the excess. Make a white strip below and imitate fur with a needle (ruffle the surface).


7. We make a bubo from a small ball. We also imitate fur.


8. For the horn, we make a small cone and wrap the edge slightly. We apply it to the mug above the ear and press.


9. We roll a small sausage for the body. It looks like a cone. We apply it to the head and make a roundish body.


10. We take blue clay for the scarf. Make a sausage. Then, make a flat long shape and apply it to the neck. After that, we make lines with a needle for greater realism in the middle of the edges. We also make a small imitation of hairs with a needle on the top and bottom of the scarf.


From a small amount of clay of the same color as the head and body, we make arms and legs. Flatten small sausages a little on a mug, make a rectangular shape.


12. We use a metallic gray color for the hooves. We apply small pieces of clay of a square shape to our hands.


13. For shoes, we roll out the circles and slightly flatten the upper edge for the toe and the lower edge for the sole. We apply it to the cup. We make a rim on top of the boot and press the rim a little with a needle.


Bake the decor directly on the mug according to the instructions for your polymer clay. Then we glue it on with epoxy glue. Polymer clay decor will not adhere well to the ceramic surface without glue.
Video tutorial on sculpting decor on a mug: New Year’s bull

Author Victoria https://www.instagram.com/tvoya__kruzhka/?igshid=1gv38pdxiksbu
How to glue polymer clay decor to a mug
For gluing polymer clay decor to a mug: You will need sandpaper, Poxipol glue (or any other epoxy adhesive), nail polish remover, toothpick, cotton pad.
First, we apply the decor to the mug and outline it with a felt-tip pen. Then we scratch the surface of the mug and decor. After that, we degrease with a nail polish remover. We mix the glue in equal proportions and distribute it with a toothpick over the surface of the decor. We apply and press it to the mug. The remaining glue can be removed with a knife after it is completely dry. The glue hardens completely for 24 hours.

You can also decorate a teaspoon as a set to our cups cupcake.


Polymer clay mug decor: Woman with a child. Photo & Video tutorial
If the clay is dirty, we use wet wipes. We wipe our hands every time we use a dark or bright color. I use Fimo gel for better adhesion of parts.


1. Body and head.
For making the head: we roll a ball so that the head is voluminous, we apply it to the mug. We make the upper part flat. Raise the bottom slightly to make the chin line.
By the same principle, we make the head of the child, but a bit smaller.
The mom’s body. You can use the remnants of different polymer clay under the bottom. We roll the sausage and apply it to the mug. Press on the sides. Thus, the impression of bulk clothing will be created.


2. For the legs, we roll the sausage of the right color straight away. At the thigh line, we make it thicker, and below we make it narrower.


3. Then we take a green polymer clay, wrap the body and press it with a needle, cut off the excess and we get a jacket.
It should slightly cover the line of the pants. To give the volume to clothes.


4. The child’s body. We make a more square body the desired shade of clay at once. Press a little on the sides.


5. The child’s hand starts from the neck. We roll a small sausage and make it slightly bent. We pull the hand to mom.


6. We make the mom’s sleeve green. Roll the sausage and apply it almost to the neck. Then, with a needle, we stretch the sleeve over the body so that there is a smooth transition. Mom’s hand should be on the baby’s tummy. Press it lightly.


7. For mom’s hair, first, we make a shape from brown polymer clay, then apply thin sausages to the base of the head and along the length of the hair. We make small hairs with a needle.


8. For the hats. We make the shape of the hat. Then we make the sausage. Press down the hats. It turns out a border. We make it flat.


9. We roll long sausages. You can do it manually. I used an extruder and a round nozzle. We make 4 strips of the same size and length. We twist the first 2 strips in one direction. The second 2 strips are in the opposite direction. 9a. In turn, we apply them to the top of the hat and cut off the excess. It turns out the effect of a knitted hat. Round off the ends with your fingers.


10. For a bubo, we roll a ball and apply it to a mug. Ruffle it and the bottom strip of the hat with a needle. It gives the impression of fur.


11. For the hands, we make small rectangles for mother and child and apply them to the sleeve. For the rim of the sleeve, we make a thin sausage and also make a fur with a needle.

12. For mom’s socks. We make sausages, slightly flatten them. We cut on the heel. Pull the sock out. We make a dimple on the foot. We apply it to the leg. We make thick stripes on top and apply them to the leg. We make fur. We make folds with a needle to make the clothes seem more voluminous.


Video tutorial:

Author Victoria https://www.instagram.com/tvoya__k
Polymer clay couple mugs decor: A half heart. Video tutorial on modeling polymer clay decor. DIY
Polymer Clay Valentine’s Day Gift DIY. Polymer clay couple mugs decor: A half heart.
In that video, you will see how to use silicone sculpting molds.

Author: https://instagram.com/an_d_r_e_w_w
Cute owl made of polymer clay on a cup. Detailed Video tutorial


Polymer clay mug decor: White cat. Beginner video tutorial

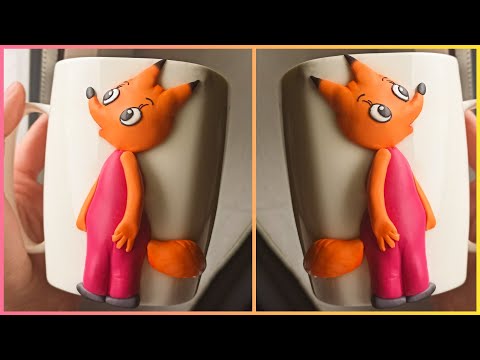
Polymer clay decor cartoon fox on a cup. Video tutorial. DIY


The decor of a mug with polymer clay: a Fox
A fox
Roll a ball out of orange color and make a slightly elongated head shape. Press the edges to the mug.
For the ears, we cut out triangles and use a needle to smooth the edges.
For the nose, roll a thin sausage with a pointed end and smooth it in the same way. At the tip of the nose, you will need a small black oval, which we press against the tip.
For the mouth, put a small piece under the nose.
For the eyes. With the help of dots, we make ovals where the eyes should be. We put a white oval there. Make a smaller hole again and put the black oval in. And from a very small white piece, we roll a ball and apply it to the black one. We do the same with the second eye.
For eyelashes, roll very small sausages with pointed corners and smooth them to the face.
For the eyebrows, we make a bend of a black thin sausage
It is better to fix all the details between each other with Fimo gel so that they hold better.
Shaping the body. The remains of polymer clay can be used under clothes. This is necessary so that the body would seem more voluminous. We roll a large thick sausage and flatten it on a mug around the edges! From above we take polymer clay for clothes of the desired color. Roll it out on the work surface and apply it to the body. Use a needle to mark the borders. We cut off the remains.
For the tail, take a thick sausage and make it thinner from 2 sides. Make it thicker in the middle.
Press to the mug around the edges. Then we roll out a piece of white polymer clay, make cuts with a knife, and apply it to the tip of the tail.
For shoes, you need two thick short sausages. We apply them to the edge of the leg, it is better to fix with them Fimo gel.
For the hands, we roll thin sausages of the same color as the head. Thin. We press it to the body. With the help of a needle, we make incisions similar to fingers. A needle can be used. For the hand that is located exactly on the mug, it is better to cut off the angle from the shoulder to the elbow. This gives the impression that the hand is hidden.
Polymer clay decor Doll on a cup. Video tutorial. DIY

Polymer clay decor Cake on a cup. Video tutorial. DIY

Author of all 6 last tutorials: Victoria https://www.instagram.com/tvoya__k
Polymer clay decor cup: Snake in the leaves and Cartoon snake. Two videos tutorials


The “The mug decor with polymer clay: New Year’s bull DIY. Tutorial for beginners” video was great!
Thank you.
I saw that sometimes you used the polymer adhesive, but sometimes you didn’t in connecting two separate pieces. How do you decide when it’s needed and when it is not?
Hello. Raw clay adheres well to each other. But you need to press down well. If it is possible to press down the details well, the gel is not needed. If the part is easy to deform, then use a gel for gluing. Our new article describes this point in great detail https://polymerclayideas.info/polymer-clay-thomas/
You’re so awesome! I do not believe I have read through something like this before.
So nice to discover another person with some genuine
thoughts on this topic. Really.. thank you for starting this
up. This web site is one thing that is needed on the web,
someone with a little originality!
You actually make it seem so easy with your presentation but I
find this topic to be actually something that I think I
would never understand. It seems too complex and extremely broad for
me. I am looking forward for your next post,
I will try to get the hang of it!
Very quickly this site will be famous amid all blog visitors, due
to it’s good posts
Thanks for the reply
I could not resist commenting. Very well written!
gangnam
I’ve been surfing online more than 3 hours nowadays, but I never found any interesting article like yours.
It’s beautiful value sufficient for me. In my view, if all website owners and bloggers made excellent content material as you
did, the internet will probably be a lot more helpful than ever before.